Trunking installation
Prior to installation of the trunking system, proper thought should be given to the products to be installed and the associated installation practices. Screeduct is dedicated to making the installation process for trunking simple and easy. We make the process, for both designers and installers, as straight forward as possible. In screed trunking allows for flush floor trunking to be achieved. Take a look at the ways of installing our trunking below:
WAYS TO INSTALL OUR TRUNKING:
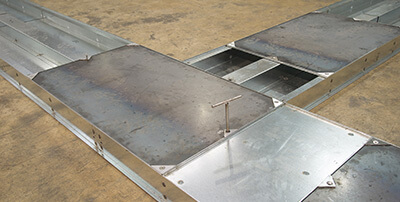
1. In the Screed
Generally, floor trunking and ducting is levelled on a mortar bed. Screeduct® systems feature unique, patented side flanges to secure trays when the screed is floated into position. Steel covers should be temporarily fitted before screeding flush with top of tray, then removed to install services after the screed has dried.
Located at the base of our ducting profiles, patented Screeduct® flanges remove the need for any mechanical fixings within the screed. This ensures that all movement is eliminated whilst strength is maintained throughout the length and width of the duct.
2. Retrospectively in apertures
For previous clients we have provided steel suspension additions, which allow trunking to be fitted into oversized apertures, which have been created in the flooring. Trunking can then be inserted and a perfectly flush finish achieved. This is often the preferred option as it is difficult to keep trunking free from debris and materials when fitted directly into the screed. Fitting into oversized apertures means that the trunking can remain clean. If you are looking for flush floor trunking this is a great option.
Fittings:
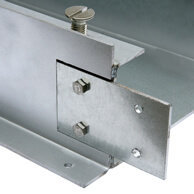
Our trunking sections are easily fitted together using a nut and bolt system. This saves on installation time on site.